
Your website security determines your visitors’ trust in your brand. This returns steady traffic to your site and you’ll rank high in SEO. To achieve that, install the SSL Certificate on your WordPress website.
Websites addressed with HTTPS indicate a secure connection.
HTTP and SSL sync to serve your client’s information encryption. As a WordPress User, you should know how to Install an SSL Certificate on Your WordPress Site. To Support the Idea you’ll learn the:
- What is SSL Certificate
- What is HTTPS
- How to Install an SSL Certificate on Your WordPress Site.
- Get the SSL Certificate
- Manual installation
- Plugins Installation
What is an SSL?
SSL is short for Secure Sockets Layers. It’s a system that protects the personal details of site visitors when they browse the server.
It prevents third-party interferences such as payment details modifications or stalking during each connection. This way, your website offers an unwavering secured connection each time a client hits your site.
What is HTTPS?
The protocol for sourcing the required documents from servers to a browser is called HTTP(Hypertext Transfer Protocol). It changes to HTTPS (Hypertext Transfer Protocol Secure) when it’s been encrypted and verified by SSL Certificate.
HTTPS is similar to HTTP only in that HTTPS (Hypertext Transfer Protocol Secure) gives a more secure connection than HTTP.
HTTPS only works with websites with SSL Certificates. Otherwise, you’ll be alerted to an unsecured connection with a red padlock display on your screen. HTTPS and SSL are 1 and 2
How to Install an SSL Certificate on Your WordPress Site
On how to Install an SSL Certificate on Your WordPress Site, First, you should:
- Get an SSL Certificate for Your WordPress site. Then choose your method of Installation, either:
- Via WordPress SSL certificate Manual Installation or
- Install WordPress Plugins
To Get an SSL Certificate for Your WordPress Site
you need to consult the Certificate Authority (CA). CAs are recognized Companies and organizations that verify the realness of your website. Afterward, you should consider the kind of SSL certificate package you want to purchase depending on the CA and how much you can pay.
Expect anything from $10 to $100s per SSL Certified year.
The good news is, as a WordPress site owner, you already have an SSL certificate on your websites. No extra charges, no hidden charges. Great news!
How to Install an SSL Certificate on Your WordPress Site?
Try WordPress SSL certificate Manual Installation
Since your WordPress website comes with an SSL Certificate, it shouldn’t be a shocker that the SSL certificate has been automatically installed on your WordPress.To be sure, contact your hosting provider.
If for some reason, your WordPress SSL Certificate isn’t installed. You can force WordPress to respond through the WordPress dashboard. It’s pretty simple:
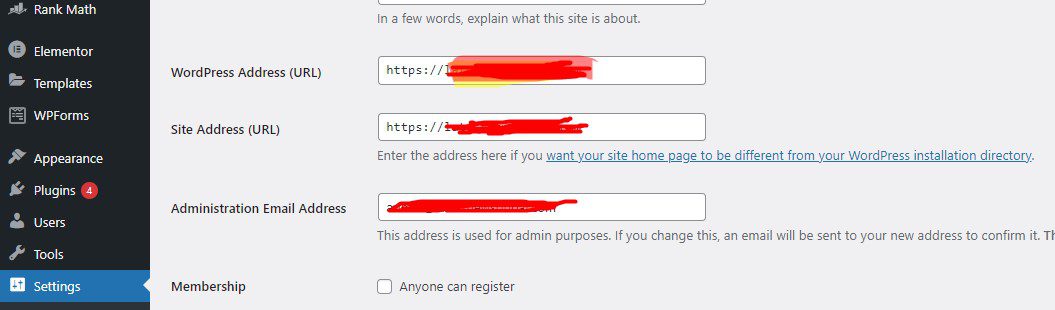
- Go to the dashboard, select Settings>>General tab
- Inside the General tab, the WordPress Address (URL) and Site Address (URL) fields should have an identical display of your site address. With HTTP prefix.
- Change HTTP to HTTPS in both fields.
- Save the changes
That’s it.
The catch is, your users are familiar with your old HTTP address version. This might hurt your SEO ranking due to inaccessible pages.
The solution is to utilize a URL redirect. There are different types of URL redirects that you can use to channel traffic to your HTTPS address version.
I’ll strongly vouch for the 301 redirects.
The 301 redirect alerts search engines that you have relocated your address to HTTPS. To achieve this, you will edit the .htaccess file using the FTP client.
WARNING: contact a WordPress expert. “NO”? don’t touch a code then.
- Connect to your website via the FTP client
- In the public_html folder locate. htaccess file
- Right-click on it, and select View/Edit.
Your local text editor will come up. Warning, ONLY scroll down to the bottom. Are you there yet? Yes? Paste the code snippets below at the bottom of your editor.
<IfModule mod_rewrite.c>
RewriteEngine On
RewriteCond %{SERVER_PORT} 80
RewriteRule ^(.*)$ https://www.yoursite.com/$1
</IfModule>
Details:
- Replace the placeholder URL in this code with your website’s HTTPS address. The code will channel all connections through port 80 to your new, secure URL.
- Save the edits to .htaccess, and click on close.
- Agree to the upload prompt from FileZilla.
Try visiting your website address. If all things are done correctly, you’ll be automatically redirected to the HTTPS version. Not sure about this?
Consider WordPress SSL Certificate Plugins
You can say “this is a semi-automatic method on how to Install an SSL Certificate on Your WordPress Site.”
Use plugins to achieve the same code modulation as when done manually.
However, Some Plugins may not be compatible with your WordPress components, which will halt the overall operation of your WordPress site till you manually locate it.
That’s why we recommend the very best WordPress plugins for SSL certificate installation.
- Simple SSL
- Cloudflare Flexible SSL
- WP Force SSL
#1. Really Simple SSL
It’s really simple to switch the WordPress SSL version with the Really Simple SSL WordPress Plugin.
No extra work of setting is required, just install and activate. The plugin does the rest. You can monitor the configuration settings and changes by the plugin. It’s Really Simple.
#2. Cloudflare Flexible SSL
Cloudflare’s flexible SSL automatically downloads and installs the required files to affect the SSL transition.
Cloudflare is excellent at abating the annoying loops when loading WordPress sites.
Again, install, activate and relax.
What do you think? The best, yeah?
However, experts have it that, though Cloudflare is secured, it’s not authentic. Think twice.
#3. WP Force SSL
WP Force SSL is a watchdog that blocks website access coming through HTTP instead of HTTPS. As a traffic router, it redirects all the traffic from your site to the target Certification. It does the necessary changes in the. htaccess code base.
Viola!
FAQs
It’s simple: Log in to your WordPress dashboard, and open the “Plugins” page. At the “Auto-Install Free SSL” listings, click the ‘Activate’ option. You’re done.
If your WordPress hasn’t it automatically installed:
-Go to the dashboard, select Settings>>General tab
-Locate the WordPress Address (URL) and Site Address (URL). These fields should have an identical display of your site address. With HTTP prefix.
-Change HTTP to HTTPS in both fields.
-Save the changes, or
-Install the ‘WordPress SSL Plugins.’
Not really, WordPress encryption happens automatically. However, for unnamed reasons you suspect that your WordPress SSL Certificate isn’t consistent? Kindly contact your web hosting provider or a WordPress expert.
Wrapping It Up
You don’t need to sweat over the context of SSL certificate installation on your WordPress websites, it happens automatically. That wasn’t the norm with yours?
Relax. How to Install an SSL Certificate on Your WordPress is pretty straightforward; with caution though. To achieve this, Use WordPress SSL certificate Plugins or, via your dashboard.
Look up the HTTPS prefix. HTTP entails insecurity. Another pointer is the green padlock that appears during the load time to a webpage.
Stay Safe!
Read Also: Free CDN Services to Speed up Your WordPress Site
We are dedicated to sharing useful content for WordPress websites in the business & personal communities. This includes any related topics indirectly related to WordPress, marketing, advertising, e-commerce, technology, or any other online subjects we feel would benefit our readers and customers.
Debashrita @ The WP Website Help Team