
if you read our last article on WordPress A/B testing titled ‘What is Google Optimize (A beginner’s guide)‘, you’re probably here for more details on how to implement it on your WordPress website. Fear not because, in this article, we dive into the specifics of A/B testing for WordPress using google optimize including examples that you can follow! If you haven’t read our previous article and are new to the topic, we definitely recommend that you check it out, here.
What you need before you set up Optimize for WordPress
Before following this step-by-step guide, it’s important to take a note of the prerequisites:
- You will need Google Analytics installed on your website. If you haven’t set up GA on your website, you can follow the official step-by-step guide to doing so, here.
- Next, you will have to download and install the Google Chrome web browser.
- To run your first WordPress A/B tests on Optimize and create experiments using a visual editor, you’ll need the Google Optimize extension for Chrome. Get it here.
Once you have the above prerequisites taken care of, you’re ready to use the best free WordPress A/B testing tool out there.
How to set up Optimize for WordPress
1. Sign-up for an Optimize account
This is a pretty basic first step – Sing up for an Optimize account here. Next, you’ll follow the setup process and give your account a name followed by viewing and agreeing to the terms and conditions of use.
Once you’ve done everything until this point, you’ll proceed to create a container. A container simply holds all of the configurations of your experiments and each Optimize account is required to have at least one container. Ideally, it is recommended to create one container for every Google Analytics property with the domain name as the container name.
2. Link your Google Analytics & Google Optimize accounts
In order to ensure the results of your WordPress A/B testing efforts are recorded accurately, it is imperative that you link your analytics account and optimize accounts properly. This is done by linking the Optimize Container you wish to carry out your WordPress A/B testing from to the correct Google Analytics property.
Wordpress A/B testing with Google Optimize Click To Tweet3. Install the Google Optimize snippet on your website
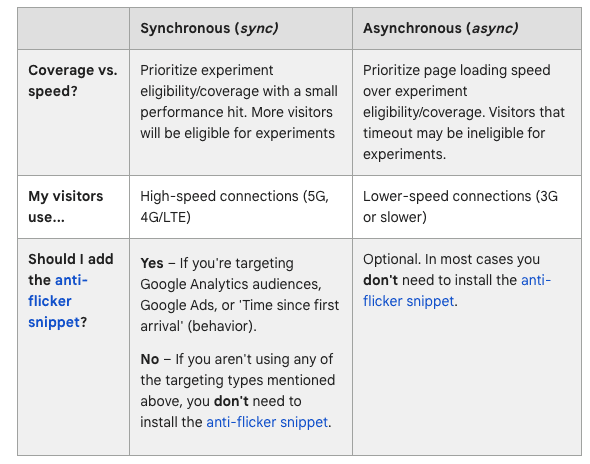
The final step before creating experiments for WordPress A/B testing is to install the right code snippet on your WordPress website. For this, you’ll need access to your website code and specifically the <HEAD> tag on your WordPress website. If you don’t have access to your code but use Google Tag Manager for your website, you can use Google Tag Manager to set things up.
If you don’t use Google Tag Manager or any other Tag Management Solutions, you can use the following links to get your code:
- Asynchronous: Prioritize page loading speed over experiment eligibility/coverage. Visitors that timeout may be ineligible for WordPress A/B testing experiments you create. Link
- Synchronous: Prioritize experiment eligibility/coverage with a small performance hit. More visitors will be eligible for experiments. Link
Now that you’ve followed the above steps, you’re all set to begin WordPress A/B testing using Google Optimize.
But, the question is, what kind of experiments can/should you run with Optimize? Here’s a quick recap from our last article:
With Google Optimize, you can run three types of effective experiments for your WordPress website.
- A/B Test – An A/B test is a randomized experiment using two or more variations of the same web page (A and B). Variant A is the original while Variant(s) B through n each contain at least one element that is different from the original.
- Multivariate Test – A multivariate test or MVT tests two variants of two or more elements simultaneously to see which combination creates the best outcome. Slightly different from A/B tests, MVT identifies the most effective variant of each element as well as analyzes the interactions between those elements.
- Redirect Test – These are normally deployed when you want to test two very different landing pages or a completely different redesign of an existing page.
In this article, we will be covering only the A/B test aspect of Optimize. but in the weeks to come, we will explore other experiments as well – stay tuned!
Creating your first A/B test for WordPress on Optimize
Before you can start testing, you need something to test on – a landing page, a home page, a product detail page or anything that you think is a valuable test. Rather than randomly testing items on your homepage or adapting your checkout flow, start small. Test a change to a Call To Action (CTA), change the colour of a button, or remove a form field, or just edit some text on an informative page. Once you’re comfortable creating variants and experiments, you can expand the scope of your testing to more complicated variants.
Prior to creating your first experience, you need to find a problem that you’re looking to solve with the help of said experiments. For example, one of your problems could be a low sign-up rate on your home page forms. In such a case, it would make sense to create an A/B test experience where one form had a different look or content than the other to see which one performs better.
The 7 Steps to create your first WordPress A/B test experience on Optimize:
- Go to your Optimize Account
- Select the Container you wish to create the experience in
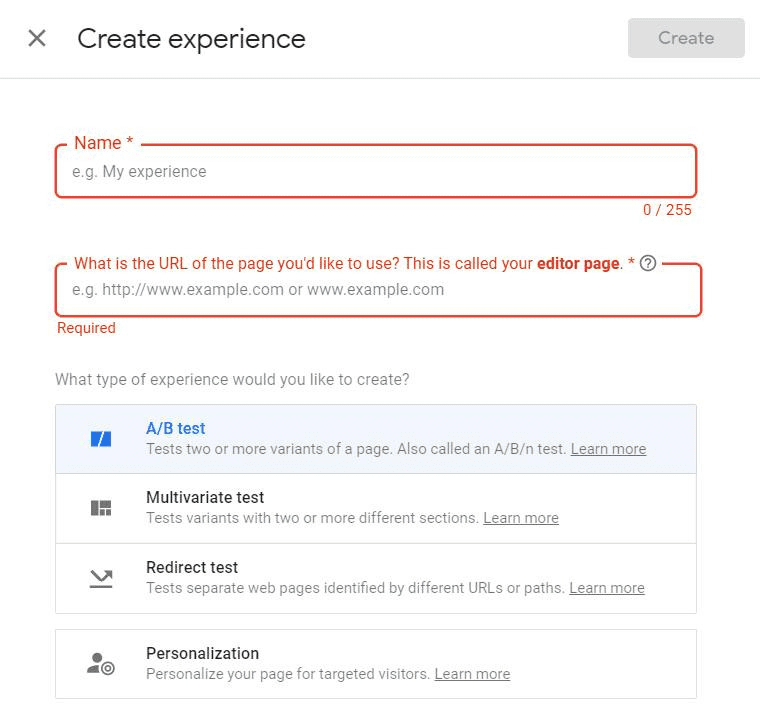
- Click the “create experience” button in the top right corner
- Give your experiment a name and make sure it is descriptive enough to give you a gist of what the experiment is
- Enter the page URL that you’d like to create the experience on (this is the page on your website you will be editing)
- Choose ‘A/B test’ as the experience type
- Click ‘create’
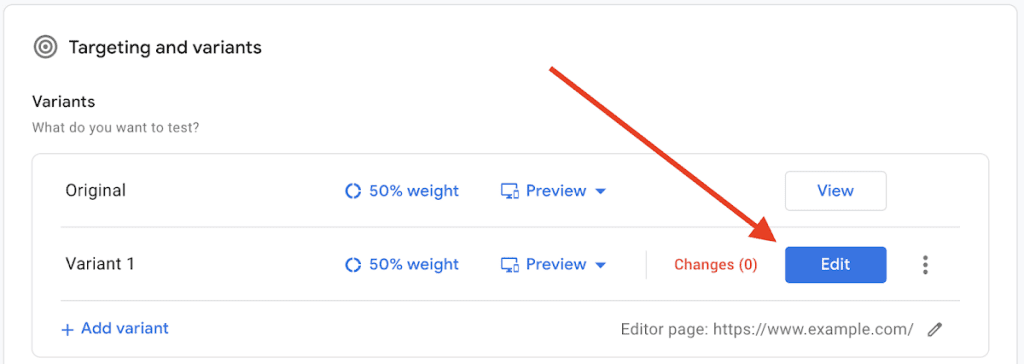
On the page that follows, you will see the option to create Variants. A variant is a variation of the original page containing changes that a change that you wish to test. Click ‘Add Variant’ to create a new variant. Give it a name and then click ‘edit’ to use the visual builder to create the experience.
Here’s how to start editing your first variant:
- Click on any web page element you wish to edit (e.g. a button).
- Use the editor panel to make a change (e.g. change the button color).
- Click Save.
- Continue making edits as necessary.
- Click Done.
Once you’re finished editing, it is time to assign weightage to the variants in an experiment – initially, you can set this to 50% for each variant which is also the default split. Next, configure the targeting and the objectives of the experiment. Targeting allows you to choose the audience that your test experience will be shown to and can be configured based on various characteristics like location, age, device etc. Objectives are the benchmarking criteria for the experiment you create.
Once you’ve set up the weightage, targeting and objectives, click ‘Run’ to have your first WordPress A/B testing experience live.
That’s all we have for you WordPress geeks in this article and we hope you enjoy setting up valuable experiments on your website. In the weeks to come, we will be diving deeper into this topic and exploring things like analysis of experiments so stay tuned. In the meanwhile, if you need an expert opinion on A/B testing for your WorPpress Website, don’t hesitate to reach out to us, here.
Frequently Asked Questions (FAQs)
Q. What are the different objectives for WordPress A/B testing?
A. Some of the most popular ones are pageviews, session duration, conversion and revenue but you can also create custom objectives. A full guide can be found here.
Q. How long should I run an a/b test on Optimize?
A. A minimum of one to two weeks or until at least one variant has a 95% probability to beat baseline is a good time depending on the objectives and traffic that your website gets.
Q. Can I make custom edits to the variants?
A. Yes, you can make hefty edits to your variants using custom HTML code
We are dedicated to sharing useful content for WordPress websites in the business & personal communities. This includes any related topics indirectly related to WordPress, marketing, advertising, e-commerce, technology, or any other online subjects we feel would benefit our readers and customers.
Nick @ The WP Website Help Team